Making a
Halloween Corpse
|
|
You want a good looking (or rather grotesque) looking Halloween corpse lurking in your yard or lounging around the house? You have come to the right place.
I have the greatest way for you to make your own Halloween corpse. It is extremely simple and gets you playing with a bunch of gooey stuff.
Sounds like fun - huh? You bet it is!
The following will be detailed directions on how to mummify or corpse a skeleton.
Supplies Needed
-
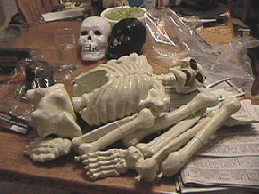
skeleton (cheapy from Big Lots or
 Wal-Mart
- usually less than $10 for a 5ft tall)
Wal-Mart
- usually less than $10 for a 5ft tall) -
duct tape (either black or silver - cheap kind, cloth, any width will do, I prefer using the 1/2 inch)
-
toilet paper (also the cheapest kind you can find) - at least 6 rolls depending on the size of the rolls
-
plastic sheeting - either plastic shopping bag, trash bag, or painters drop cloth to protect your workspace - (this is a very messy project, trust me - you will need this)
-
white latex house paint mixed with some orange craft paint and very small amount of black craft paint (or you can have the paint mixed to look like old skin - a little on the rusty, brownish color - Have you ever watched the movie, The Mummy?)
-
very small can of stain gel (I used chestnut color)
Preparation
You will need to prep your skeleton / Halloween corpse.
I thought that I would get smart and try to bypass this step but I found out I was wrong.
If you do not prep your skeleton and try to apply the paper mache directly to your plastic skeleton, it will come off real easy. It's pretty cool, I have to admit. The mache stays in the shape of the skeleton and is pretty rigid.
Now if you handle your skeleton extremely gently, you might get away with not prepping but I think you would be awfully disappointed when it comes time to decorate your yard haunt or your house and the mache comes off just when you need it the most.
Back to prepping the Halloween corpse - get your duct tape and tape up your skeleton.
Cut about two to three inch strips of tape, the shorter the easier to handle, doesn't tangle as bad, whatever works best for you. I'm a klutz when it comes to trying to keep tape from tangling with itself so smaller works better for me.
Wrap the tape all over the plastic. Be sure the press the tape in all the crevasses to keep the original form and all the detail as best as possible.
To get a real gory look, don't tape portions of the rib  cage. I put tape into the indents that separate the ribs but skipped the rib
bones. I will explain why for this later below.
cage. I put tape into the indents that separate the ribs but skipped the rib
bones. I will explain why for this later below.
You don't need to cover every inch of the plastic but cover with no more than about 1/4 inch of plastic showing between the tape pieces.
If you want your Halloween corpse to be static, tape the joints the way you want them to look. Otherwise if you want the body to move or bend a bit, do not tape the joint areas. Tape all around the areas but don't tape one part to the next.
Set Up
Use a workspace that you can leave your Halloween corpse out to dry overnight.
You will need an area about as big as your table in the kitchen or card table or floor area. Lay out your plastic sheet on your workspace.
Get out your prepped Halloween corpse. You can assemble him (if it's unassembled) or you can leave him in pieces. It's easier to corpse smaller pieces of skeleton but harder to assemble after it's been corpsed. I did better assembling before I mummified him. Up to you.
Get out your paper mache that you have already made up. Get a spoon (new or old - the paper mache washes up great so nothing will get hurt if you use your good dinnerware.) Set out a couple of rolls of toilet paper.
Let's Corpse!
Take four sheets (four squares) of toilet paper. I took  the sheet and
rolled it as I counted out four sheets and then tore off. Lay the paper in the
palm of your hand and hold it over your bowl of mache.
the sheet and
rolled it as I counted out four sheets and then tore off. Lay the paper in the
palm of your hand and hold it over your bowl of mache.
Dip your spoon into the mache and spread it on the toilet paper. If you try to dip your toilet paper, it will pull apart , depending on how cheap the paper is. Mine would melt almost the minute that I put on the mache - I had to be careful.
Glob the mache on nice and thick. Make sure that you get all the edges of the toilet paper wet. Yes, you are going to get it on your hands.
If you have problems with getting the mache on your hands, then I would suggest purchasing some latex gloves (not too thick - harder to work with).
When the whole square of toilet paper is wet, drip off the major
excess of mache. Don't worry about getting every drop.
Take your mache'd up toilet paper and turn the wet side down and put it on your skeleton.
Press it on your Halloween corpse firmly. Tuck into every crevasse.
The toilet paper will want to stick to your fingers. Just get your fingers wetter
with the mache and and press the toilet paper into place. If part of the paper
won't stick, dip the spoon into the mache and pour over the part that won't
stick and then smooth it down.  I
used the back of the spoon to somewhat smooth the paper down.
I
used the back of the spoon to somewhat smooth the paper down.
When there is indents or crevasses on the skeleton, don't pull the toilet paper tight. When it dries, the paper pulls tighter by itself and if you already pulled it tight, it tends to crack (might be a good effect though).
If you left spots on the rib cage where you did not tape, corpse up to that area but leave the un-taped area clean. I then took a single sheet of paper and twisted it, dipped it into the mache and stretched that over the exposed ribs to give a stringy fleshy look.
Your fingers will get real sticky. Don't worry about that, not a big thing - your hands will wash off. Once it dries on your hands, it's really easy to peel it off. Actually I was able to mache better when I had alot of the mache on my fingers. The toilet paper didn't seem to stick as much to my hands.
Sometimes when the toilet paper pulls away a bit from your Halloween corpse, it will give it a shredded skin kind of look. Not a bad thing. Very excellent effect. I tried to make sure some of my corpses had the pulled and ripped paper on them at least somewhere - I loved the effect.
Painting
Now comes the painting.
I used house "bone" white flat latex paint (not kidding - it was called bone white - cool huh?). Mixed in orange craft paint and then the black. Don't use as much black as you did orange. This will give you your flesh color.
You can get the paint pre-mixed but you will pay a whole lot more than if you just buy the plain white. I looked for the cheapest that I could find.
The paint goes a long way so you don't have to mix too much at a time. I used a plastic bowl that had a tight fitting lid, poured a bit of white in it. Then I took my paint brush and dipped it into the orange paint and wiped it off into the bowl with the white. I did that several times until I thought that I had enough orange.
Rinsed the brush out. Then got the black craft paint and did the same as the orange but used very little.
I used a painters stir stick (one of those wooden flat sticks you can get where you buy paint) and stirred up my mixture.
If it comes out too dark, add more white and possible a bit of orange. If it's too orangey, add some more black. It all depends on your personal preference of what color you actually want the whole thing to be.
Now paint the Halloween corpse. I did mine with the airbrush method. Mostly meaning that I did not paint every inch of the corpse. I got all the main parts but did not fill in all the holes and crevasses.
Don't paint in the areas that you left the tape off of - for instance the rib cage area. Paint up to the part that got mache'd but still leave the ribs exposed. If you have that stringy bit over the ribs, paint that small piece.
Finishing Touches
Return to top of Halloween Corpse page
Happy Haunting!

|
Home |
About Us |
Privacy |
Disclaimer |
Site Map |
Contact |
|
Testimonials |
Awards |
![]()
|
Copyright © 2005 -
All About Halloween, LLC All Rights Reserved |